Published: 12-09-2016
Contents
Overview
The theme is to be able to collect data, store it, and then make it available to the end user in a an appropriate format. In this particular example a temperature sensor coupled with a Arduino Uno is be used to collect the data. The data is sent to a Node/Express web server where it is stored in a MySQL database. The data is presented to the user via a web page displaying configurable graphs. The article is split up into two main sections, the data collection and the server-side app which stores and displays the data.
All the code can be found on my Github account.
Data Collection
Collecting data involves interacting with the sensor, reading the temperature and then transmitting this data to the web server. There are several ways of sending data to the server using an Arduino. The Arduino could be equiped with either a 3G or WIFI shield. A 3G shield makes a remote standalone system possible. Using a WIFI shield is cheaper but requires a WIFI access point nearby. I don't have either of those, but I do have a Raspberry Pi which can be easily connected to a network with a WIFI dongle (the newer ones have built in wireless).
The Raspberry Pi acts like a relay for the Arduino. The webserver has no direct form of communication with the Arduino. Instead of the Arduino dictating the data flow the Raspberry Pi will request data from the Arduino using the serial port.
Arduino pre-requisite
Getting the Arduino IDE on Ubuntu:
# Download from https://www.arduino.cc/en/Main/Donate
# Go to download directory and un-tar
cd ~/Downloads
tar -xvf arduino-1.6.11-linux64.tar.xz
cd arduino-1.6.11

# To run
./arduino

# To install icon
./install.sh
On Linux trying to connect to the /dev/ttyACM0 (Arduino serial port) might result in an error if the user doesn't have permission to access this port. A permanent fix is to add the user to the dialout group and logout-login.
# Add current user to dialout group
sudo usermod -a -G dialout $(whoami)
Temperature sensor
The DS18B20 is a one wire digital temperature sensor that is easy to use. The sensor can be controlled using the Dallas Temperature Control library, which in turn depends on the OneWire library. The libraries need to be download and placed in the Arduino IDE sketchbook/libraries folder which is normally found under /home/<user>.
# Move to the sketchbook library
cd /home/<user>/Arduino/libraries

# Download the Dallas Temperature Control Library
git clone https://github.com/milesburton/Arduino-Temperature-Control-Library.git

#Download the OneWire library
git clone https://github.com/PaulStoffregen/OneWire.git

# Restart the Arduino IDE
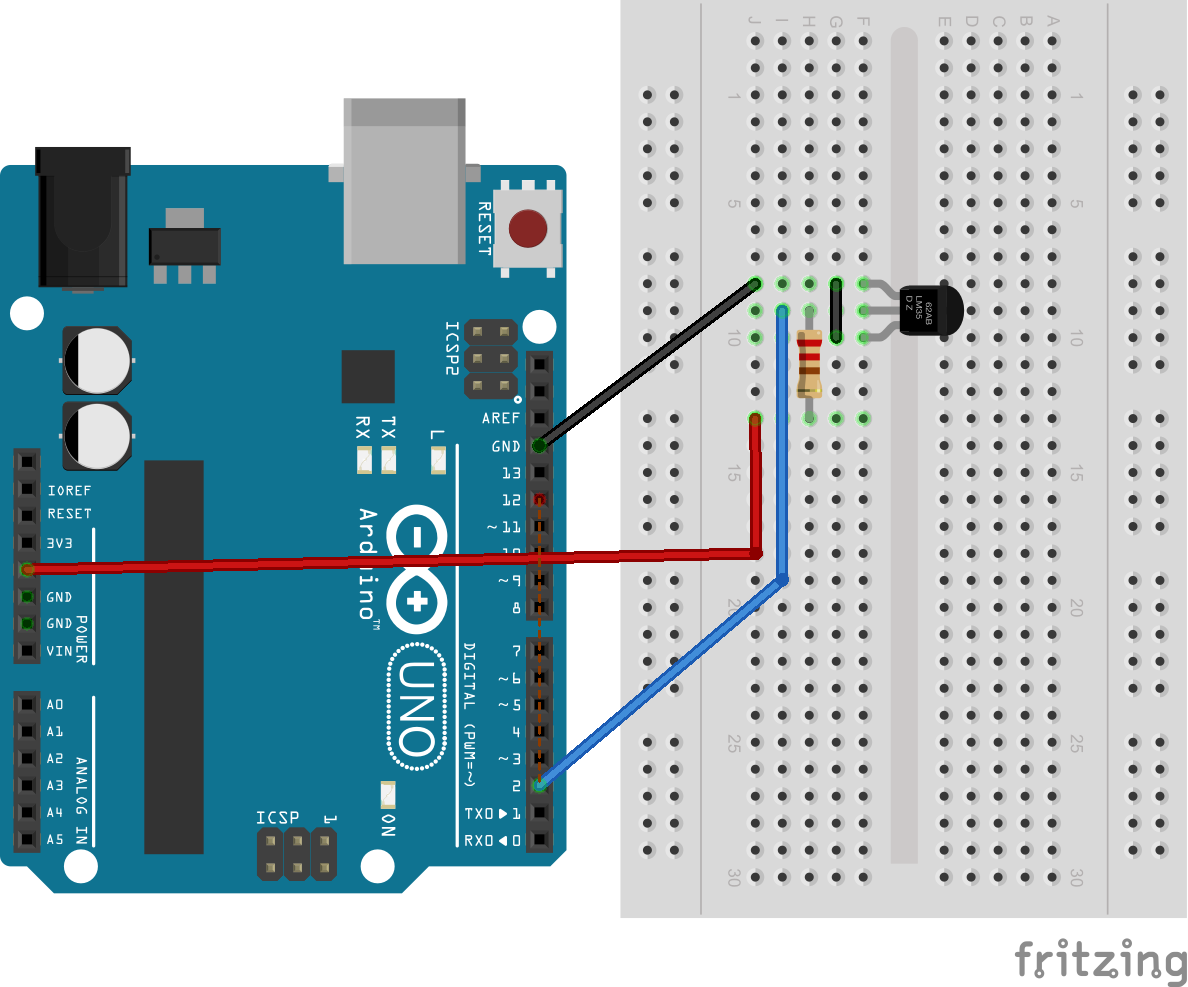
Restarting the Arduino IDE loads the libraries into the menu so examples can be opened. Connecting up the temprature sensor is simple. The datasheet can be found here. Both GND and Vdd pins are connected to ground. The data line is connected to the VQ pin and pulled up to 5Vs using a 4k7 resistor and the 5V power line.
Reading the temperature
The simplest way to get started is just to use the simple example shipped with the Dallas Temperature Control Library. This code prints out successive temperature readings to the serial port which can be viewed over the serial monitor.
Firmware vs. Firmata
There are two ways of using the Arduino. The first is writing a program (firmware) that gets loaded onto the board and executed whenever powered on. The second is using Firmata. A program can be loaded onto the Arduino which allows communication through the Firmata protocol. The Firmata protocol allows you to write firmware from the host computer. Communication is sent over the serial port and executed on the Arduino. It uses a client-server model, where the Arduino is the server and the host computer is the client. Firmata libraries can be found for most languages. Johnny-five is a JavaScript library that abstracts the processes of use Firmata to control the Arduino.
Firmware and Pi Relay
All the code for this section can be found on Github.
Arduino
Here the Arduino is to run custom firmware. The Arduino needs to respond to the Pi's requests for data. Requests are to be made in the form of a string over the serial port. The code to handle this is a combination of the Dallas simple example and the SerialEvent example (examples => communication => SerialEvent) The code is below:
#include <OneWire.h>
#include <DallasTemperature.h>

// Data wire is plugged into port 2 on the Arduino
#define ONE_WIRE_BUS 2

// Setup a oneWire instance to communicate with any OneWire devices (not just Maxim/Dallas temperature ICs)
OneWire oneWire(ONE_WIRE_BUS);

// Pass our oneWire reference to Dallas Temperature.
DallasTemperature sensors(&oneWire);

String inputString = "";         // a string to hold incoming data
boolean stringComplete = false;  // whether the string is complete

void setup() {
  // initialize serial:
  Serial.begin(9600);
  // reserve 200 bytes for the inputString:
  inputString.reserve(200);

  // Start up the temp sensor library
  sensors.begin();
}

void loop() {
  // print the string when a newline arrives:
  if (stringComplete) {
    if(inputString == "temp\n") {
      // Get temperature
      sensors.requestTemperatures();
      Serial.println(sensors.getTempCByIndex(0));
    }
    inputString = "";
    stringComplete = false;
  }
}

/*
  SerialEvent occurs whenever a new data comes in the
 hardware serial RX.  This routine is run between each
 time loop() runs, so using delay inside loop can delay
 response.  Multiple bytes of data may be available.
 */
void serialEvent() {
  while (Serial.available()) {
    // get the new byte:
    char inChar = (char)Serial.read();
    // add it to the inputString:
    inputString += inChar;
    // if the incoming character is a newline, set a flag
    // so the main loop can do something about it:
    if (inChar == '\n') {
      stringComplete = true;
    }
  }
}
The Arduino sends data when requested by the Pi. To request data the Pi sends a string over the serial port, in this case the string temp. The Arduino reads characters from the serial port until it comes across a newline character \n. It then goes through some if statements and runs the appropriate code. In this case it finds temp and so gets the temperature and sends it back over the serial monitor.
This method makes it easy to add future sensors without breaking backwards compatibility. Just add another if statement and the sensor logic. A true timestamp is not available on the Arduino unless set from the Pi so the timestamp is just set on the Pi. This means the timestamp is slightly delayed but considering the frequency of the temperature change being measured this is acceptable. It is also a systematic error, which can be compensated for. Using the serial monitor this happens:
Raspberry Pi
The code for this part can be found in the bin directory. The Pi needs to be able to sent data to the Arduino using the serial port and read the reply. Seeing as the web server is to be written in JavaScript, it makes sense to use it here as well.
A quick side note. Node is used to run JavaScript outside of the browser. It wraps up the Google V8 JavaScript engine in event-driven, non-blocking model. This event-based model seems to fit well when used with sensors. Sensors are usually used to monitor equipment/the environment and trigger actions based on thresholds. Check out this blog post by Chris Williamsarticle. End of side note.
To communicate with the Arduino a serial interface library is needed, enter serialport, a native module which provides access to serial ports. To install, run the line below. If it moans consult the docs, installing native modules can throw up some problems if the correct build tools are not present.
npm install serialport
The previous assumes Node is installed. There is a script for installing Node correctly in the helpful-scripts folder. To use serialport a connection is opened with the port, which for the Arduino is /dev/ttyACM0. An interval is setup to make requests even so often. Events are created to handle responses. Here's the code:
var SerialPort = require("serialport");

// Connects the Arduino port with following settings
// Newline parser trigger 'data' event when reaching '\n'
var port = new SerialPort("/dev/ttyACM0", {
  baudRate: 9600,
  parser: SerialPort.parsers.readline('\n')
});

// Trigged when port connection opens
port.on('open', function() {
	// Fires requests ever 2 seconds
	var interval = setInterval(function () {
		port.write('temp\n')
	}, 2000);
});


// Triggered when Arduino sends data followed by '\n'
port.on('data', function (data) {
	// Create timestamp
	var date = new Date()
	// Log data
 	console.log('sending ' + date + ' ' + data);
});

// open errors will be emitted as an error event
port.on('error', function(err) {
  console.log('Error: ', err.message);
});
Using Firmata
The same thing can be achieved using the Firmata protocol and an appropriate library. The Firmata protocol has been implemented in many languages and is often abstracted further with libraries like Johnny-Five in JavaScript.
Communication with server
The Pi is assumed to be connected to a network with Internet access so there are a few common options to send the data to server. A HTTP POST request would work, but a more interesting option is websockets. Websocket enable bi-directional communication and in theory improved throughput for higher frequency data transmission. The socket.io and socket.io-client JavaScript libraries make this easy.
var socket = require('socket.io-client')('http://localhost:3000');

// Triggered when socket is connected
socket.on('connect', function (err) {
	console.log('connected to server')
	if(err) {
		console.log(err);
		return;
	}

	// Send some data to the server
	socket.emit('channel', 'This is the payload')
});

// Triggered when receiving data from server with channel 'event'
socket.on('event', function (data) {
	// Do something with the data
});
Combined with serial port communication this small JavaScript App can now request data from the Arduino and send it to an awaiting web server. As it allows bi-directional communication so theoretically settings could be send to the App as well. These could specify what data is to be sampled and at what rate. A similar process could be done using WIFI or 3G directly on the Arduino. Standard HTTP requests (GET/POST etc.) however, can only be made from client to server and therefore polling would be required to get any settings or update from the server.
Web Server
The servers role is to accept data send from the sensor, process and store the data, then make it available through a web interface. First thing to do is to create a web server. JavaScript and NodeJS are most familiar, although this could be done in any language with any framework. One reason NodeJS is a good choice is it's ability to seamlessly expose web sockets, thanks to it's non-blocking architecture. Web sockets allow data to be pushed to client making it relatively simple to create realtime data visualisations.
Node server setup
Express is a popular web framework for NodeJS. The easiest way to get started with it is to use the express-generator. The generator also lets you choose a rendering engine, should you want one. Here handlebars is being used. To generate an express app run:
npm install express-generator -g

# Check out the options
express -h

# Create my-app with handlebars engine
express --hbs my-app

# Start the server up
cd my-app
npm run start
Adding Stylus
There was an option to use Stylus as a CSS preprocessor when generating the App structure. This would have embedded Stylus as middleware which doesn't seem like a good thing to do. The App shouldn't be compiling CSS during any request, the CSS should be static, compiled during the development phase. This is the opposite to handlebars, which is dynamic, and requires request time compilation.
Stylus is easy to set up separately. To install with NPM:
npm install stylus --save
Using Handlebars with Express
The express-generator adds the hbs package. By default it is setup to use views/layout.hbs as the layout template. When calling a view using res.render(), that view will be placed into the layout.hbs {{{body}}} tag. Below is an example of this:
// views/layout.hbs
<!DOCTYPE html>
<html>
  <head>
    <title>{{title}}</title>
  </head>
  <body>
    {{{body}}}
  </body>
</html>

// views/index.hbs
<h1>{{title}}</h1>
<p>Welcome to {{title}}</p>
// In Express
res.render('index', { title: 'Demo' });

// Resulting page
<!DOCTYPE html>
<html>
  <head>
    <title>Demo</title>
  </head>
  <body>
    <h1>Demo</h1>
	<p>Welcome to Demo</p>
  </body>
</html>
A different base layout or even no base layout can be specified by changing the locals passed in:
// Use other.hbs as the layout view
res.render('index', { title: 'Demo' , layout: 'other'});

// Don't use a layout view
res.render('index', { title: 'Demo' , layout: false});
Handlebars templates generally make use of partials and helpers. Partials are used to make re-usable 'mini' templates that can be called from inside any template. Helpers are functions used to help modify local data for things like filtering or conversion etc.. Enabling partials and helpers in Express is done like this:
//  In app.js
var hbs = require('hbs');

// Register single helper
hbs.registerHelper('helper_name', function(...) { ... });

// Register single partial
hbs.registerPartial('partial_name', 'partial value');

// Load all partials from a directory
hbs.registerPartials(__dirname + '/views/partials');
Getting sensor data
Storing sensor data
Data Retrieval and Presentation
Line Charts
I had been playing around with a some code to create line chart while learning D3. Moving that code into its own NPM package. Modified it to accept updates. Added an optiona grid using d3.scaleLinear.ticks().
Using Amazon
A PHP Version
References